Recessed Lighting Layout: Finding the Right Spacing and Locations
Your Recessed Lighting Layout Can Affect Your Overall Lighting Quality.
Your recessed lighting layout affects almost every aspect of the lighting in your room. It is the time to make decisions about what kind of tasks you intend to perform in a room, what kind of ambient lighting you want and even the amount of drama you want in your room. Fortunately, picking the right recessed lighting layout is a matter of asking a few questions and then structuring your recessed lighting around the answers. In this article, I will go through each of those questions and then discuss how the answers should affect your layout.
Task Lighting
The first question is whether you plan to use your recessed lighting for any task lighting. Task lighting is lighting used to perform actual tasks in your room like cleaning dishes and reading. Placing the lighting where it can assist you in performing those tasks should be your first priority; everything else will be built around it.
Note, however, that there are a number of task for which recessed lighting should not be used. Specifically, anything where someone leans his or her head over the work area is a poor place for recessed lighting, as the head’s shadow will get in the way of the work space. Examples of this are kitchen counters and desks. In all such cases, another form of task lighting should be used.However, if there are task areas that can be well lit by recessed lighting, like lighting side tables, bars or pool tables, then make a note on a copy of your room’s plans where exactly you would like those lights to be. Remember that your recessed lighting layout is inflexible, so be sure that you are comfortable with those decisions.
Wall Washing
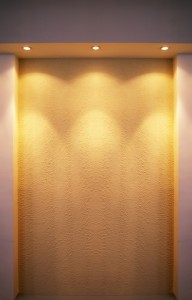
Recessed lighting can provide one of the best sources of ambient lighting for any room by doing what is called “wall washing”. Wall washing is when you shine light onto the wall from above, usually from an angled lighting fixture within the housing of recessed lights. Note that this is distinct from “accent lighting”, which highlights areas on the wall. Wall washing washes most of the wall and doesn’t just highlight sections.
Wall washing is very popular as it can improve the quality of light in the entire room. By shining light on the walls, wall washing provides the illusion of pushing the walls further away, making the room feel larger. In addition, it reduces some of the lighting contrast in the room, making the room feel more like the outdoors. Finally, the reflected light from the walls bounces into the entire room, removing some of the harsh shadows that can be cast by recessed lighting.The main question with wall washing is just how far away from the wall you want to place the wall washers. In fact, the answer differs based on the type of textures on the wall. Shining light across a surface highlights all of the textures on a surface, so the further away from the wall your wall washers are, the less they will show off your wall’s surface.
So, if you have a surface whose texture you really want to highlight, like wood paneling or granite, then you should put your wall washers closer to the walls. If you aren’t as concerned with textures and would rather have more ambient light bounce from the walls, then you should put the wall washers further away.
On the other hand, if you don’t want to wash the walls at all and would like a room with a move cave-like feel, then you should make sure that your housings are far enough from the wall that the walls are not struck by their beams (I will discuss beams below). Striking walls accidentally with beams, especially if it is more than half-way down the wall, is a common and unattractive mistake in a recessed lighting layout.
Beams and Drama
Finally, you will need to decide how you want the beams to be arranged in your recessed lighting layout. In fact, there are two common ways of arranging the beams from recessed lighting. Each of them will provide your room with a different lighting quality, so you should consider which one best provides the look that you want.
First, we’ll need a little theory for our recessed lighting layout. Because of the way that recessed lighting is built, the light that comes out of it includes two concentric beams. The brighter, inner beam is the light that shines directly from the bulb itself. The dimmer, outer beam is the light that comes from the housing, but only indirectly from the bulb.So, the question is, how should these concentric circles be arranged so that they hit the floor with the best pattern? Two solutions are common:
The first is the “grid” configuration. In the grid configuration, the lights are arranged so that each circle is directly above and below another circle, and directly to the left and right of another circle, as though they were on the points of a piece of grid paper. The recessed lighting spacing is set such that so that their inner brighter circles just barely touch the inner circles of the four adjacent lights. The reason that they just barely touch is that, if they overlap, you’ll get bright slivers of light all over the floor.
The difficulty (or perhaps the strength) of this configuration is what happens to all of those empty spaces between the circles. Imagine a group of tennis balls lines up in many rows, right on top of the other. There will be a lot of gaps between the tennis balls. This means that the light that shines on the floor will not be even. However, this may not be such a bad thing. Variations in light create a much more dramatic space that creates visual interest in the room through the use of contrast. Using a grid configuration is very dramatic, creating darker and lighter areas that engage the eye.
The second configuration is the “honeycomb” configuration. In the honeycomb configuration, every other row of lights is shifted, so that it fills in the gaps between the beams of the row next to it. Imagine the tennis balls again. When the rows of tennis balls are placed right on top of each other, there are big holes between the tennis balls. However, if you shift the rows of tennis balls so that they fall into the gaps between the tennis balls of the row below them, the holes between the tennis balls become much smaller.
The advantage of a honeycomb configuration is that the light is far more even than in the grid configuration. While there will still be small gaps, they will be barely noticeable. So, if you want a light that just provides general ambience rather than drama, honeycomb lighting may be the best solution. However, the light from recessed honeycomb lighting can seem very flat. If you do decide to use it, you should make sure that you have sufficient objects of visual interest throughout the room so that people do not become bored or restless.
Putting it All Together
There are a few choices to make when putting together a recessed lighting layout:
- Start with your room’s task lighting. Your grid can be built around those few needed places.
- Decide whether you want wall washing and how much of your walls’ texture you want to show off.
- If you want more dramatic light, use a grid configuration. If you want a more even light, use a honeycomb configuration.
These points will allow you to put together a recessed lighting layout that is right for your room.
Back from Recessed Lighting Layout to Recessed Lighting Fixtures


